

The nailing schedule is the single biggest driver of shear wall capacity in wood-framed construction. Nail size, edge spacing, field spacing, and panel blocking collectively define how much lateral force a wall can resist. The role of nailing schedules in shear design is so direct that changing edge nailing from 6 inches to 2 inches on center can multiply unit shear capacity several times over. Standards including SDPWS, NDS, and IBC govern these requirements, and every permit set must reflect them accurately. Getting the schedule right is not a detail. It is the design.
How do nailing schedules define shear capacity in wood shear walls?
The SDPWS governs lateral systems in wood construction by providing tables for unit shear capacity organized by nail size, spacing, and panel thickness. Those tables make one thing clear: the nailing schedule is the design variable with the most leverage. Panel material matters far less than how the panel is fastened.
Edge nailing spacing drives capacity more than any other single factor. Walls nailed at 6 inches on center at the edges carry roughly half the lateral capacity of walls nailed at 3 inches on center. Tighter spacing increases both stiffness and strength, which is why high-seismic and high-wind designs routinely specify 3-inch or even 2-inch edge nailing.

Nail size is the second critical variable. 8d common nails at 0.131 inches diameter are the standard for residential shear walls. Box nails at 0.113 inches diameter have lower capacity and are not interchangeable with common nails. Gun-driven nails must match ICC-ES evaluation reports to qualify as equivalent. Substituting nail type without verifying the evaluation report is a code violation.
Blocking completes the system. Without solid wood backing at every panel edge, the sheathing cannot transfer shear uniformly across the wall height. Blocked shear walls carry significantly higher allowable loads than unblocked assemblies. Unblocked walls often carry roughly half the capacity of blocked ones per SDPWS reduction factors.
| Edge Nail Spacing | Blocking | Relative Shear Capacity |
|---|---|---|
| 6" on center | Unblocked | Lowest (baseline) |
| 6" on center | Blocked | Moderate |
| 3" on center | Blocked | High |
| 2" on center | Blocked | Highest |
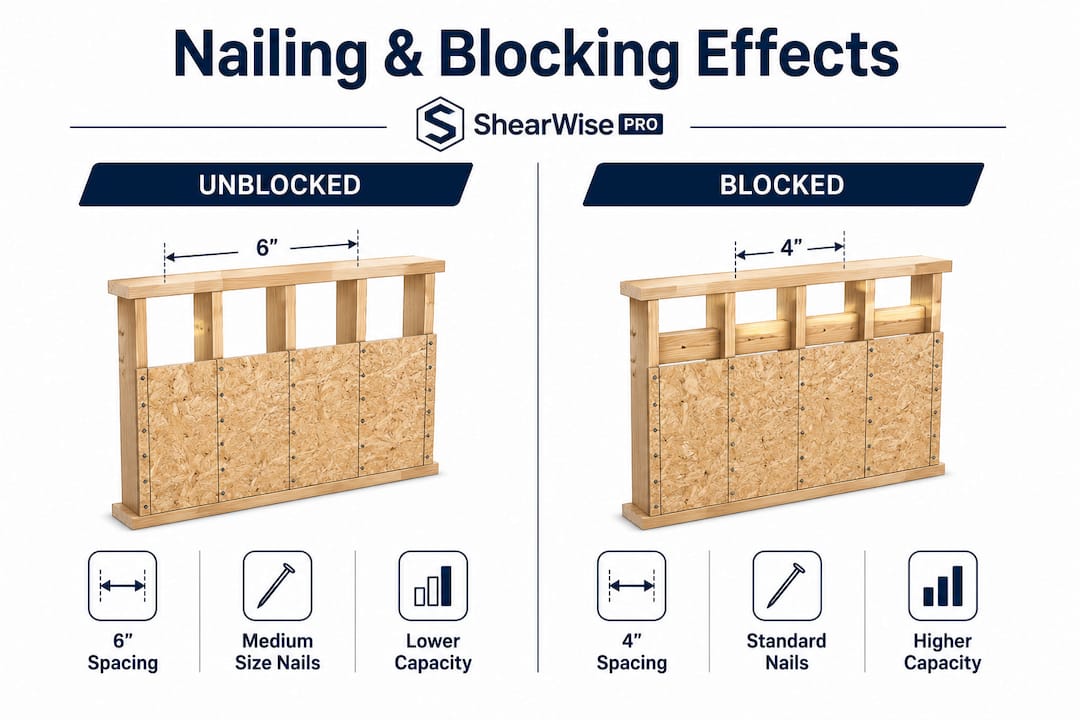
Pro Tip: When your shear force calculation lands close to a capacity limit, tightening edge nailing from 6 inches to 4 inches is often faster and cheaper than adding a new wall line.
What common mistakes in nailing schedules undermine shear wall performance?
Field errors in nailing schedules are the most common reason shear walls fail to perform as designed. The problem is that most of these errors become invisible once drywall goes up. By then, the only way to verify compliance is destructive investigation.
The most damaging errors include:
- Over-driven nails. Over-driven nails reduce shear capacity by approximately 20% per APA test data. The nail head punches through the panel face, eliminating the bearing surface that transfers load. This is the most common gun-nailing error on framing crews.
- Incorrect nail type. Substituting box nails for common nails without an ICC-ES equivalency report reduces capacity. The diameter difference of 0.018 inches between an 8d common and an 8d box nail translates directly to lower lateral resistance.
- Edge distance violations. Minimum edge distance per SDPWS is 3/4 inch. Nailing too close to the panel edge causes panel tearing under load, which drops capacity sharply.
- Missing blocking. Skipping blocking at horizontal panel joints cuts capacity in half. Framers sometimes omit blocking to save time, not realizing it invalidates the engineer's calculations entirely.
- Wrong spacing. Installing nails at 6-inch edge spacing when the schedule calls for 3 inches cuts capacity by roughly half. This error is easy to make when the framing crew is working from an unclear or unmarked plan set.
These errors do not just affect structural performance. They create permit and inspection failures that delay projects and require costly rework.
Pro Tip: Mark shear wall locations and nailing schedules directly on the framing plan with a bold legend. Framers work from what they can read on site, not from the structural notes.
How do different types of nailing schedules and blocking configurations influence shear design?
The choice between blocked and unblocked shear walls is not just a capacity question. It is a design strategy decision tied to seismic design category, wind exposure, and available wall length. Understanding sheathing in shear walls and how blocking interacts with nailing patterns is foundational to that decision.
Blocked walls are preferred in seismic and high-wind zones because they deliver higher capacity and reduce failure risk. In Seismic Design Category D and above, blocked assemblies with tight edge nailing are typically required. Unblocked walls are acceptable in lower-demand applications such as Seismic Design Category A or B with modest wind loads, where the reduced capacity still satisfies the shear force demand.
Sheathing material is a secondary variable. Plywood and OSB rated equivalently per code carry similar shear capacities when the same nailing schedule is applied. Engineers specify "wood structural panel" per schedule rather than a specific material. The nailing schedule, not the panel species, controls the outcome.
When demand increases, the correct response is to tighten the nailing schedule before widening the wall. A 4-foot wall nailed at 2 inches on center with blocking can outperform an 8-foot wall nailed at 6 inches on center without blocking. That counterintuitive result is why nailing schedule details deserve more attention than wall length in many design scenarios.
For high-demand conditions, engineers also specify double-sided sheathing, which effectively doubles the available shear capacity. This approach requires careful attention to hold-down forces and chord stud sizing, since the increased shear demand transfers directly into the boundary elements.
What practical steps ensure accurate nailing schedule implementation?
Accurate implementation starts at the permit drawing stage. A valid shear wall schedule for permits must specify structural panel species and thickness, fastener specifications, and unit shear capacity in pounds per linear foot. Lateral analysis, wall layouts, and anchorage details must also appear in the permit set to document the continuous load path.
Follow these steps to carry design intent from drawing to field:
- Publish a clear shear wall schedule on the structural drawings. List nail size, edge spacing, field spacing, blocking requirements, and panel thickness for every wall type. Use a table format that framers can read at a glance.
- Coordinate with the framing crew before work begins. Walk the shear wall locations with the lead framer. Confirm they understand the difference between edge nailing and field nailing, and that they know which walls require blocking at horizontal joints.
- Verify nail gun settings before framing starts. Air pressure settings directly affect nail depth. Set the gun so nails sit flush, not countersunk. A quick test board before the crew starts each day takes less than two minutes.
- Inspect at the framing stage, before drywall. Special inspection is often required in high-demand seismic and wind zones. Even where not required, a framing inspection catches errors while they are still correctable. After drywall, verification requires destructive methods.
- Document the inspection with photos. Photograph each shear wall before it is covered. Record nail spacing, blocking locations, and hold-down hardware. This documentation protects the engineer of record and supports permit closeout.
- Flag and correct over-driven nails immediately. Over-driven nails cannot be corrected by adding more nails in the same location. The fix is to add supplemental nails at the correct spacing in undamaged panel areas, per the engineer's direction.
Key takeaways
The nailing schedule controls shear wall capacity more than any other design variable, making accurate specification and field verification non-negotiable.
| Point | Details |
|---|---|
| Nailing schedule drives capacity | Edge spacing, nail size, and blocking together determine unit shear capacity per SDPWS tables. |
| Spacing changes double capacity | Tightening edge nailing from 6 inches to 3 inches on center roughly doubles lateral wall strength. |
| Blocking is not optional | Unblocked walls carry approximately half the capacity of blocked assemblies under SDPWS reduction factors. |
| Field errors are invisible post-drywall | Over-driven nails and missing blocking must be caught at the framing stage before walls are covered. |
| Permit drawings must be complete | A valid shear wall schedule lists panel thickness, fastener specs, and unit shear capacity in pounds per linear foot. |
Why nailing schedules deserve more respect than they get
I have reviewed hundreds of permit sets where the structural drawings showed careful moment frame calculations, detailed hold-down schedules, and precise shear force diagrams. Then I looked at the nailing schedule. It was a single line buried in the general notes: "Shear walls: 8d at 6" edge, 12" field, blocked." No wall types. No capacity table. No distinction between the 200 plf wall in the garage and the 600 plf wall at the stair.
The most common oversight in wood-framed lateral design is treating nailing as secondary, when the nailing schedule actually constitutes the entire lateral system design. The framing crew does not read the shear force diagram. They read the nailing schedule. If that schedule is ambiguous, incomplete, or inconsistent with the calculations, the wall built in the field will not match the wall in the model.
Field enforcement is the other half of the problem. Nailing errors are invisible after drywall. I have seen projects where the special inspector signed off on framing, but the inspection happened after insulation was installed and only the bottom two feet of the sheathing were visible. That is not an inspection. That is a signature on a form.
The engineers and architects who get this right treat the nailing schedule as a first-class design output, not a standard note. They coordinate with framers before the job starts, they specify nail gun settings, and they inspect before drywall. The common design mistakes that end up in litigation almost always trace back to a nailing schedule that nobody took seriously until the wall failed.
— Evalin
ShearWise Pro: nailing schedules built into every calculation
Shear wall design requires more than a capacity table. You need organized wall lines, accurate shear force calculations, hold-down forces, and a permit-ready report that shows the full load path.

ShearWise Pro is built specifically for 1-story and 2-story wood-framed projects. The platform organizes wall lines, full-height segments, openings, hold-down forces, transfer straps, and story drift checks in one place. Every calculation ties directly to a clean PDF report formatted for permit submission. You can review a sample report before you commit, and training tutorials walk through the full workflow. If your current process involves manual spreadsheets and separate note pages, ShearWise Pro consolidates that into a single, reviewable output.
FAQ
What is a shear wall nailing schedule?
A shear wall nailing schedule specifies nail size, edge spacing, field spacing, panel thickness, and blocking requirements for each shear wall type in a project. It is the primary document that defines the wall's unit shear capacity in pounds per linear foot.
How does edge nail spacing affect shear wall capacity?
Edge nail spacing has a direct and large effect on shear capacity. Walls nailed at 6 inches on center carry roughly half the lateral capacity of walls nailed at 3 inches on center, per SDPWS capacity tables.
Are plywood and OSB interchangeable in shear walls?
Plywood and OSB rated equivalently per code carry similar shear capacities when the same nailing schedule is applied. The nailing schedule, not the panel material, is the primary capacity driver.
Why do over-driven nails reduce shear wall capacity?
Over-driven nails punch through the panel face, eliminating the bearing surface that transfers lateral load. APA test data shows this reduces shear capacity by approximately 20% per over-driven nail location.
When is special inspection required for shear walls?
Special inspection is required in high-demand seismic and wind zones to verify that nailing schedules, blocking, and hold-down hardware are installed per the structural drawings. Inspection must occur before drywall covers the sheathing, since errors cannot be verified without destructive methods after finishing.